This whole experience for the past three months is just the beginning of my relationship with clay. It has given me great insights on clay as a student and a whole new perspective as an educator. I've ventured into various art forms such as acryllic and oil painting, printmaking, photography and digital art before and none has touched me deeply as how clay did. With clay, I found myself breaking new grounds, going beyond my comfort level. And I found myself breaking a few pots as well.
I guess the frustrations I felt helped me to identify better with the pupils in my class who may be struggling to learn something new. The things that I've learnt could be applied to other disciplines as well and I am now slightly more confident and optimistic about setting up my own clay studio in school. At least, I have a clearer idea of what I would be in for.
I guess my greatest challenge in working with clay was to overcome my own fear. I was afraid of the simplest thing like to make carvings on my pots or to even decide on the design of my form as I feared that it would not work out. I even feared that I would not have enough time to complete my work and so I procrastinated on even getting started. The fear gave me a slow start to things but once I overcame that, there was no stopping. That led to another hurdle as the fatigue from continuously working on on pot, and not know when to stop, physically drained me out.
Though I am not able to fully admit that I have managed to overcome all the hurdles, I am able to manage them better now. One of the ways that I found useful was to sketch out any ideas that came to mind. I trawled through websites to seek out ideas that appealed to me. I have to keep reminding myself to snap out of my reverie at times and to instead pen down my visualisations to make them real. Another thing I had to work on was my time management. I was worn out and had to bring my school work home on work days and thus was unable to commit myself to long hours in the studio. Thus, I had to make time on my rest days and commit myself to studio work. Setting a stop time would help too as I tend to get carried away once I get started. Keeping a journal or for my case, a blog, also helped me along in this journey as penning down my thoughts kept me connected to what I was doing.
Throughout this journey, my primary focus had been on the processes involved rather than the product. I still consider my works to be pretty conservative and have yet to venture into making something more adventurous. I wanted to digest the basics of every method and took the time to think, make mistakes and recover. I think the wonderful thing I experienced was the transformation of the ideas at the various stages. An accidental mark on the pot may spark of an impromptu design and at times I found myself yielding to what the clay wants instead. At the end of it all, my satisfaction came from having experienced each of the process from the start till the end. Though it has come to the end of the course, for me, it is just the start.
Tuesday, April 13, 2010
Saturday, April 10, 2010


Tuesday, April 6, 2010
Useful Links for the Classroom
Here are some great finds from the web that you may help you in the classroom.
Comprehensive Lesson Plans
Example of a Pottery Class Assignment
Lesson Ideas
Comprehensive Lesson Plans
Example of a Pottery Class Assignment
Lesson Ideas
Basic Ceramics1
View more presentations from Noreen Strehlow.
Friday, April 2, 2010
Moulding Clay

Apparently, I found that clay is humanlike in many ways. First of all, it has to be treated with respect. It has to kept properly and be given enough time to recuperate. You will know that your clay is stressed out when it breaks easily. That moment signals for rest. Keep the clay aside under a wet rag first or better still, keep it wrapped in plastic. Air dries the clay up as it is mainly composed of water and earth. You must not neglect it for too long either as it will become pretty uncooperative.
Like a child, soft clay can be shape a moulded to your desired product. An important stage where foundations are laid, you have to prepare it properly. No shortcuts here. Leather-hard clay is somewhat like a teenager. Though rebellious in nature, there is still room for change. Clay that has set is like an adult. Not much change or addition can be made at this stage. It breaks easily too. Handle it with care.
Monday, March 29, 2010
Sunday, March 28, 2010
Friday, March 26, 2010
Painting and Glazing
This is most definitely my favourite part of the process. Glazing is pretty easy as the glaze has already been prepared and the paints are also ready-made. The colours will be pretty much the same as it looks now as to when the vase has been fired. It can get pretty complex if I decide to create my own blend of colours like Paul Jackson. I love his works and hope to be able to apply his style to my biggest pot. For now, it's just a simple green to accentuate the leave and the rest is awashed in white to provide the contrast. My precious vase. Still conservative here as this is my first time colouring. Mmm..I thought that I was a risk-taker. What's going on here...maybe I will make more pots and find the courage to try out everything and anything.


Saturday, March 20, 2010
All Fired Up
There are a few types of kiln firing. During the course I learnt about Bisque and Glaze firing. For Bisque Firing, the pots must be bone-dry and then packed into the kiln. The stacks can be stacked on each other or props and shelves can be used to create levels. There are three main cycle to take note of. In the first cycle, pots are fired steadily for 6 hours at the rate of 100 deg celsius per hour. Steam from the moisture in the pots will start to form and the flue cover will have to be removed. It can be replaced before the next cycle.
At the next cycle, the clay morphs into ceramic. It will fire continuously till it reaches the temperature of 1000 deg celsius at the rate of abt 110 deg celcius. This will take around 3.5 hrs. The last cycle is where the pots are left to soak in the remaining heat for about 15-20 mins. Below is a drawn cross sectional view of a kiln.

At the next cycle, the clay morphs into ceramic. It will fire continuously till it reaches the temperature of 1000 deg celsius at the rate of abt 110 deg celcius. This will take around 3.5 hrs. The last cycle is where the pots are left to soak in the remaining heat for about 15-20 mins. Below is a drawn cross sectional view of a kiln.


Tuesday, March 9, 2010
Slab-Building

Slab-building is a way of creating geometrical forms of ceramics. To begin, I shaped a huge lump of wedged clay into a cube. This is done by rotating it to the sides, forming it into a cube (in my case, a cuboid). It is then placed on a folded piece of newspaper, with a yardstick on either side. The yardstick is used to guide my cutting wire which is used to slice even slabs out of the clay cube. This step is repeated until I have 6 + a few extra slabs for back-up purposes. Once they are leather-hard, these slabs will be used to form the box. The edges of these slabs are beveled at about 45 degrees angle all around. This is done with a ruler and a pen-knife. The surface of the edges are scored and given some slit before they are joined together. Score and smoothen out the joints. I did not have time to take the pictures as I'm busy with work but I will put some good links up soon.

Thursday, March 4, 2010
The Big One
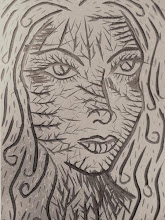
The big coiled pot is finally up. I was admiring my pot when the shadow of my side profile fell on it. It was a moment of relief as I suddenly got the inspiration to carve out my profile onto my pot. I will post more pictures up soon but for now, these picture shows the pot in the making.


Sunday, February 28, 2010
The Great Collapse

Though my pot lay broken, my spirit stayed intact. I spent the rest of my precious Saturday to start on a new pot. I feel so exhausted, this being the most challenging project by far. Hopefully this pot will be completed by this week. I will be back!
The Coiling

The coiling method is for forming big pots. It is pretty challenging for me as I had trouble rolling out perfect coils until I learnt a trick that worked well for me. I could not seem to find the rhythm and coordination when I roll the coil on the workbench.They would ended up flat and break easily. I read up on the topic and learnt that I could roll coils in between my hands instead. This is pretty difficult to do as the coil gets longer. Once the coil is too long to handle, I would then place it on the table to continue.
Friday, February 19, 2010
The Coil Building Technique
Coil building is a method for building large vessels with or without the pottery wheel. Coils can be hand-rolled (highly recommended) or be extruded through die forms. The latter produces coils that have less structural strength than the hand-rolled ones as the compression of the rolling actually wedges the clay, giving it more plasticity.
Creating the Base:
 Place lump of wedged clay in the centre of the turntable. I actually took aim and threw my lump of clay at the centre just to make sure that it sticks well. Then I placed two yardsticks on either sides and began to flatten it out with a rolling pin.
The tricky bit comes when I have to cut out the base with the needle. I had to position my elbow well and I moved the needle in over the top of the slab, concentrating at one point. Initially, it was hard as my eyes tended to follow the wheel but I soon overcame that.
Building the Foundation:

 The first coil has to be super thick in order to lay a good foundation for the rest of the coils. The ones that comes next will gradually decrease in their diameters. I had to score the surface and apply slit before placing each coil. After which, the inner and outer walls are scored in a downward motion (to compress the coils) and smoothened out. When scoring the walls, provide support with your hands to help retain the form. Align your coils according to the form you wish to create.


Creating the Base:
 Place lump of wedged clay in the centre of the turntable. I actually took aim and threw my lump of clay at the centre just to make sure that it sticks well. Then I placed two yardsticks on either sides and began to flatten it out with a rolling pin.
The tricky bit comes when I have to cut out the base with the needle. I had to position my elbow well and I moved the needle in over the top of the slab, concentrating at one point. Initially, it was hard as my eyes tended to follow the wheel but I soon overcame that.
Building the Foundation:


Saturday, February 13, 2010
Don't Leave Your Pot Out in the Rain
 My few hours of work just went down the drain. Reached home today in the rain and suddenly remembered that I had left my pinch pot outside to sun. I did not save it in time. I'm feeling a little *#%!!! now.
 Friday, February 12, 2010
My Weapons
My pottery tools....ouh.. I left out my cutting wire.
Check this link out for a glossary of tools and its uses.


Coiled Vase

 I enjoyed making this but my main concern now is how to decorate it later. I already like it just the way it is. I'm planning to use this for my large sunflowers. This is made through the coiling method. Rolls of clay are simple laid on a round base. The joints where the coils meet are then obliterated to compress them together. I left a good opening at the top which took me quite a while to do up. I hope I've wedged my clay well enough before this. I would want this lovely vase to explode in the kiln. I will put up more info about the coiling method when I find the time. Now its time to rest!
Thursday, February 11, 2010
Drawn In
At last! This is my favourite pinch pot. The spiral-like carved lines draws me into looking in.

Tuesday, February 9, 2010


Saturday, January 30, 2010
Pinch Pots
•
- Begin with a small ball of clay
- Use your thumb to press a hole in the centre of the ball
- Turn the ball in the other hand as you squeeze and pinch upwards.
- Feel the walls up and even out the thickness with your fingers
- Place the finished form upside down to rest
- Repeat the steps above to create an exact replica
- Score the lips of the form and slather some slit on
- Put these two forms together, joining them to form a sphere
- Score the joints together and smoothen out the surface
- Allow the sphere to stand overnight to become leather hard before you begin to work on decorating it
Wednesday, January 27, 2010
Reclaiming Clay
I finally got myself to learn more about this technique as it would be useful in case I can no longer afford to use ready-made clay. Clay that has not been fired can be reused over and over again. This technique requires a simple set-up. You will need some cotton rags, large covered bins to contain the clay and some sponges and small water containers. You may want to purchase some stone slabs from the garden shop. These will be used as a base for drying out the clay mixture.
First Step:
Dry out the clay completely. You can sun it out in the open for a few days.
Second Step:
Break the dry clay into smaller pieces and place them into the bins.
Third Step:
Slake the clay down by adding some warm water to cover the clay completely. Cover the bin and leave it to soften overnight. The
Fourth Step:
Remove the excess water with a sponge and spread the softened clay onto the stone slabs. The stone slabs should preferably be placed out in the open. Allow the clay to firm up.
Fifth Step:
Once the clay can be removed from the slab, turn it over to even out the drying process. This could be repeated until the clay in a workable condition.
Sixth Step:
Remove the clay from the slab and wedge it well. You can now store the clay by wrapping them in the damp cotton rags and placing them into a covered dry bin.
Saturday, January 23, 2010
States of Clay

Below are the basic states of clay in which I will work with:
Powder State: Clay powders are blended with water to create clay bodies, engobes or mixed with glaze for decoration. Interesting!
Slip(slurry): The slip is made of clay that is saturated with water. Called the "slippery-doo-dah" in our pottery class, it is as runny and slippery as its nickname suggests. It is my good friend when it comes to joining leather hard bits of clay together. In my own term, its my "glue" when I handbuild pots. Before applying slip on the surface I want to join, I will score the surface first to ensure that the two pieces will bite and create a stronger joint.
Plastic: Clay in this versatile state is used to for pinching pots, rolling and coiling, slab construction and wheel throwing. Its plasticity will depend on the amount of moisture it contains. To keep clay in a good working condition, I have to prevent it from drying out. The clay needs to be hydrated to make it more plastic. This can be done by adding water and leaving it overnight to allow the particles in it to become evenly saturated. Another method is to age it over a period of time to improve its plasticity.
Leather-Hard: This is clay that has begun to dry and though it already has form, it can still be manipulated to a certain degree, depending on the stage of hardness it is in. It has lost some of its plasticity but it can still be joined, carved and textured for decorative purposes.
Bone-dry: Clay in the bone-dry state is at a stage where it is ready to be fired. Moisture from the clay has evaporated out and it has lost all of its plasticity. If anything falls apart at this stage, chances are that it cannot be put back together anymore. At this fragile state, it pays to be careful. (and yes, I had to learn it through the hard way!)
Friday, January 22, 2010
Types of Clay

I learnt about the different types of clay and out of curiousity, dug up some information about the various types of clay. I nearly got buried by the information. There is a huge variety available, and you can even concoct your own custom blend of clay body. Mixing your own custom blend will require a lot of testing but you will be able to create your own unique effect. However, it is important to get your foundations right first before you start playing around. So not to digress too much, I'll narrow it back down to the types of clay mainly used in the pottery studio. Below is a general breakdown:
Earthenware: Garden pots are usually made out of red earthenware because of its porous quality. They can be glazed to be made waterproof for use in the kitchen. Red earthenware is the least expensive type of clay. White earthenware is costlier, but the finished product is ideal as tablewares or for decoration.
Stoneware: Has an gritty texture to it and like what its name suggests, it is dense and hard like stone when fired. It is basically stronger than the other clay types.
Porcelain: Porcelain are dense and vitreous when fired and they may even be translucent and glass-like if they are thin enough. They are commonly used to make dinnerware.
Preparing the Clay
I got introduced to clay that had been recycled. Unused pots are broken into little fragments and soaked in water. They are then left to decompose in the sun before they are soaked in huge, black rubbish bins again. Basically, I saw murky water with slimy caked up clay waiting beneath it. I drained the water off and sponged of any excess, leaving just the muddy stuff. With my bare hands, I soften the muddy stuff, squelching and squeezing the gooey stuff through my fingers. Lastly, I scoop a huge ball out (imaging a muddy snowball that stinks). It may sound like a fun way to get to know clay but it sure helps to dispel any last romantic thoughts I had of it. Clayball fights anyone?
Monday, January 18, 2010
Research
Books were aplenty to cover every single aspect in ceramic making. I chose a few and was introduced to the step-by-step methods through the picures and thorough explanations. Interesting! I see some potential in this.
Good Reads:
The Potter's Studio Handbook by Kristin Muller
Decorating Techniques by Joaqim Chavarria
Throwing Pottery Techniques revealed by Mary Chappelhow
The Basics:
Good Reads:
The Potter's Studio Handbook by Kristin Muller
Decorating Techniques by Joaqim Chavarria
Throwing Pottery Techniques revealed by Mary Chappelhow
The Basics:
Saturday, January 16, 2010
The First Lesson
Basically, I learnt about the objectives of the course and mainly, I found out about the process and tools involved in ceramics making. Its quite a mean feat. A niggling thought told me to wiggle my way out now before I get sucked in deeper but it was quickly doused out by my deepening curiousity. I've decided to know my enemy better and maybe we can become friends. Maybe. Now, I was more concerned about all the new terms I've learnt.
The Fear
Fear was the first feeling to compound inside me when I got to know that somehow, I've been enlisted into a ceramics course. I had signed up for a 3D art course, but the first lesson inducted me unwittingly into an area I've tried to avoid. Of course I love challenges but this, I felt was beyond me.
A lot of negative thoughts ran through my mind. I am pretty much a practical person person. How would this course benefit me when I could hardly afford the time or patience to indulge in this form of art. Frustration began to take its seat beside my fear. How could I ever learn something that I couldn't even begin to like?
It dawned on me then that this must be how some of my students may feel when I teach them a subject that they are weak in or even hate. If anything, this was worth the shot for my students. If I could overcome this fear, then perhaps, I could help them overcome any of theirs. And so, the much reluctant journey begins.
Wedging Clay
Wedging clay helps to remove air bubbles and it increases the plasticity of the clay. This is an essential process and if it's not done properly, say sayonara to your pot as trapped air bubbles will cause the pot to explode when it is fired. There are two basic ways to wedge the clay, namely the ox-head method and the spiral method.
The Ox-Head:
The Ox-Head:
•Place a mound of clay on the workbench
•Hold the sides of the clay
•Using your palms, push the clay downwards and away from your body
•Roll the clay back towards you in a smooth rocking motion.
•Repeat this rocking motion.
The Spiral:
•Place hands on the sides of the rounded mound of clay
•Use your right hand to push down on the clay as you roll it towards your body.
•Use your left hand to hold and rotate the clay, pushing against the rolling force.
•Use your upper body weight to facilitate this motion.
•Use your left hand to lift and pivot the clay anti-clockwise while your right hand pushes the clay downwards.
•Rotate the clay and compress it against the workbench to remove the air bubbles.
Subscribe to:
Posts (Atom)